Choosing Your Bin Style
There are three main approaches to worm bins, each with trade-offs. Your choice depends on budget, space, and how hands-on you want to be.
Option 1: Plastic Tote Bin (Cheapest)
A simple, modified plastic storage tote. This is the most popular DIY option and what most beginners start with.
Cost: $10-20 Difficulty: Easy Best for: Beginners on a budget, small households
Option 2: Stacking Tray System (Most Convenient)
Multiple trays that stack vertically. Worms migrate upward as lower trays fill with castings, making harvesting easy.
Cost: $80-150 (commercial) or $30-50 (DIY) Difficulty: Moderate Best for: People who want easy harvesting, medium households
Option 3: Wooden Bin (Most Durable)
A custom-built wooden box. More aesthetically pleasing and provides better insulation than plastic.
Cost: $30-60 in materials Difficulty: Moderate (basic woodworking) Best for: Outdoor use, larger operations, people who like building things
Option 1: Building a Plastic Tote Bin
This is the quickest, cheapest way to start. You can build this in 15 minutes.
Materials
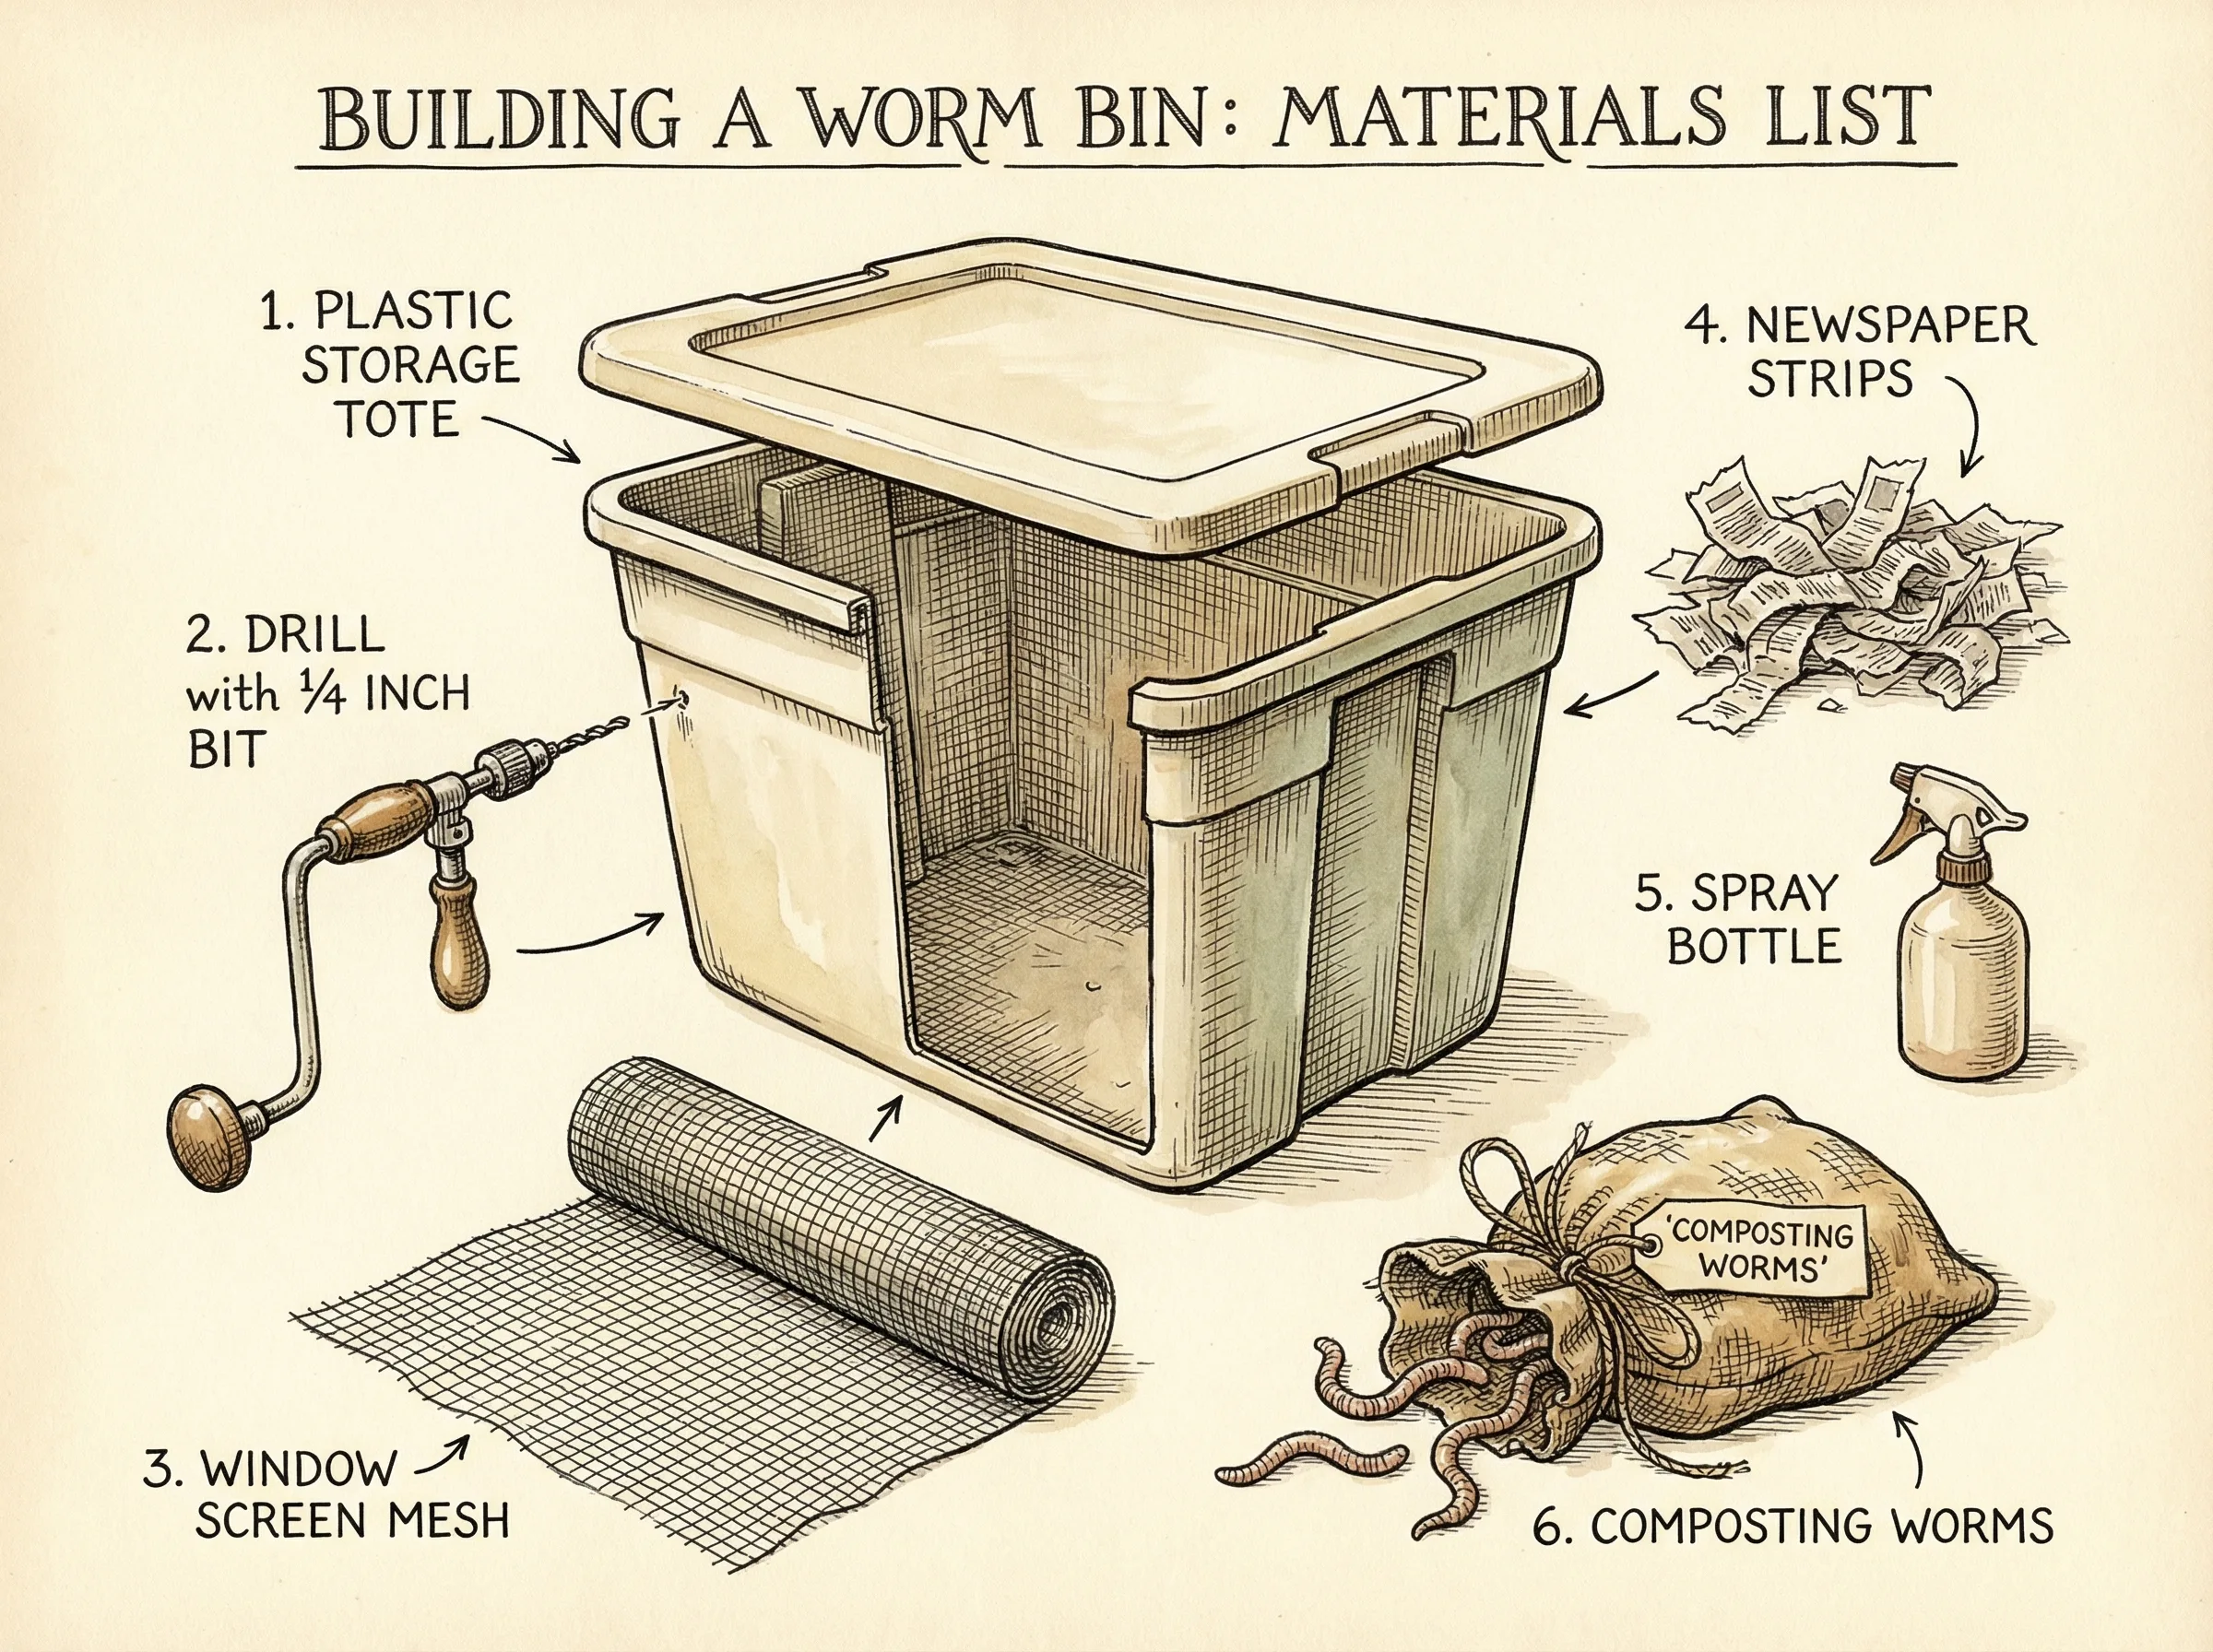
- 1 opaque plastic storage tote (8-14 gallon / 30-53 liter) with lid. Don't use clear plastic — worms need darkness. Rubbermaid Roughneck totes work great.
- A drill with a 1/4 inch and 1/16 inch drill bit
- Window screen mesh or landscape fabric (small piece, about 6x6 inches)
- Hot glue gun (optional, for securing screen)
Instructions
Step 1: Drill ventilation holes in the lid. Using the 1/16 inch bit, drill about 20-30 small holes in the lid, spread evenly. These provide airflow while keeping the bin dark. Don't skip this step — worms need oxygen and the bin needs gas exchange to prevent anaerobic conditions.
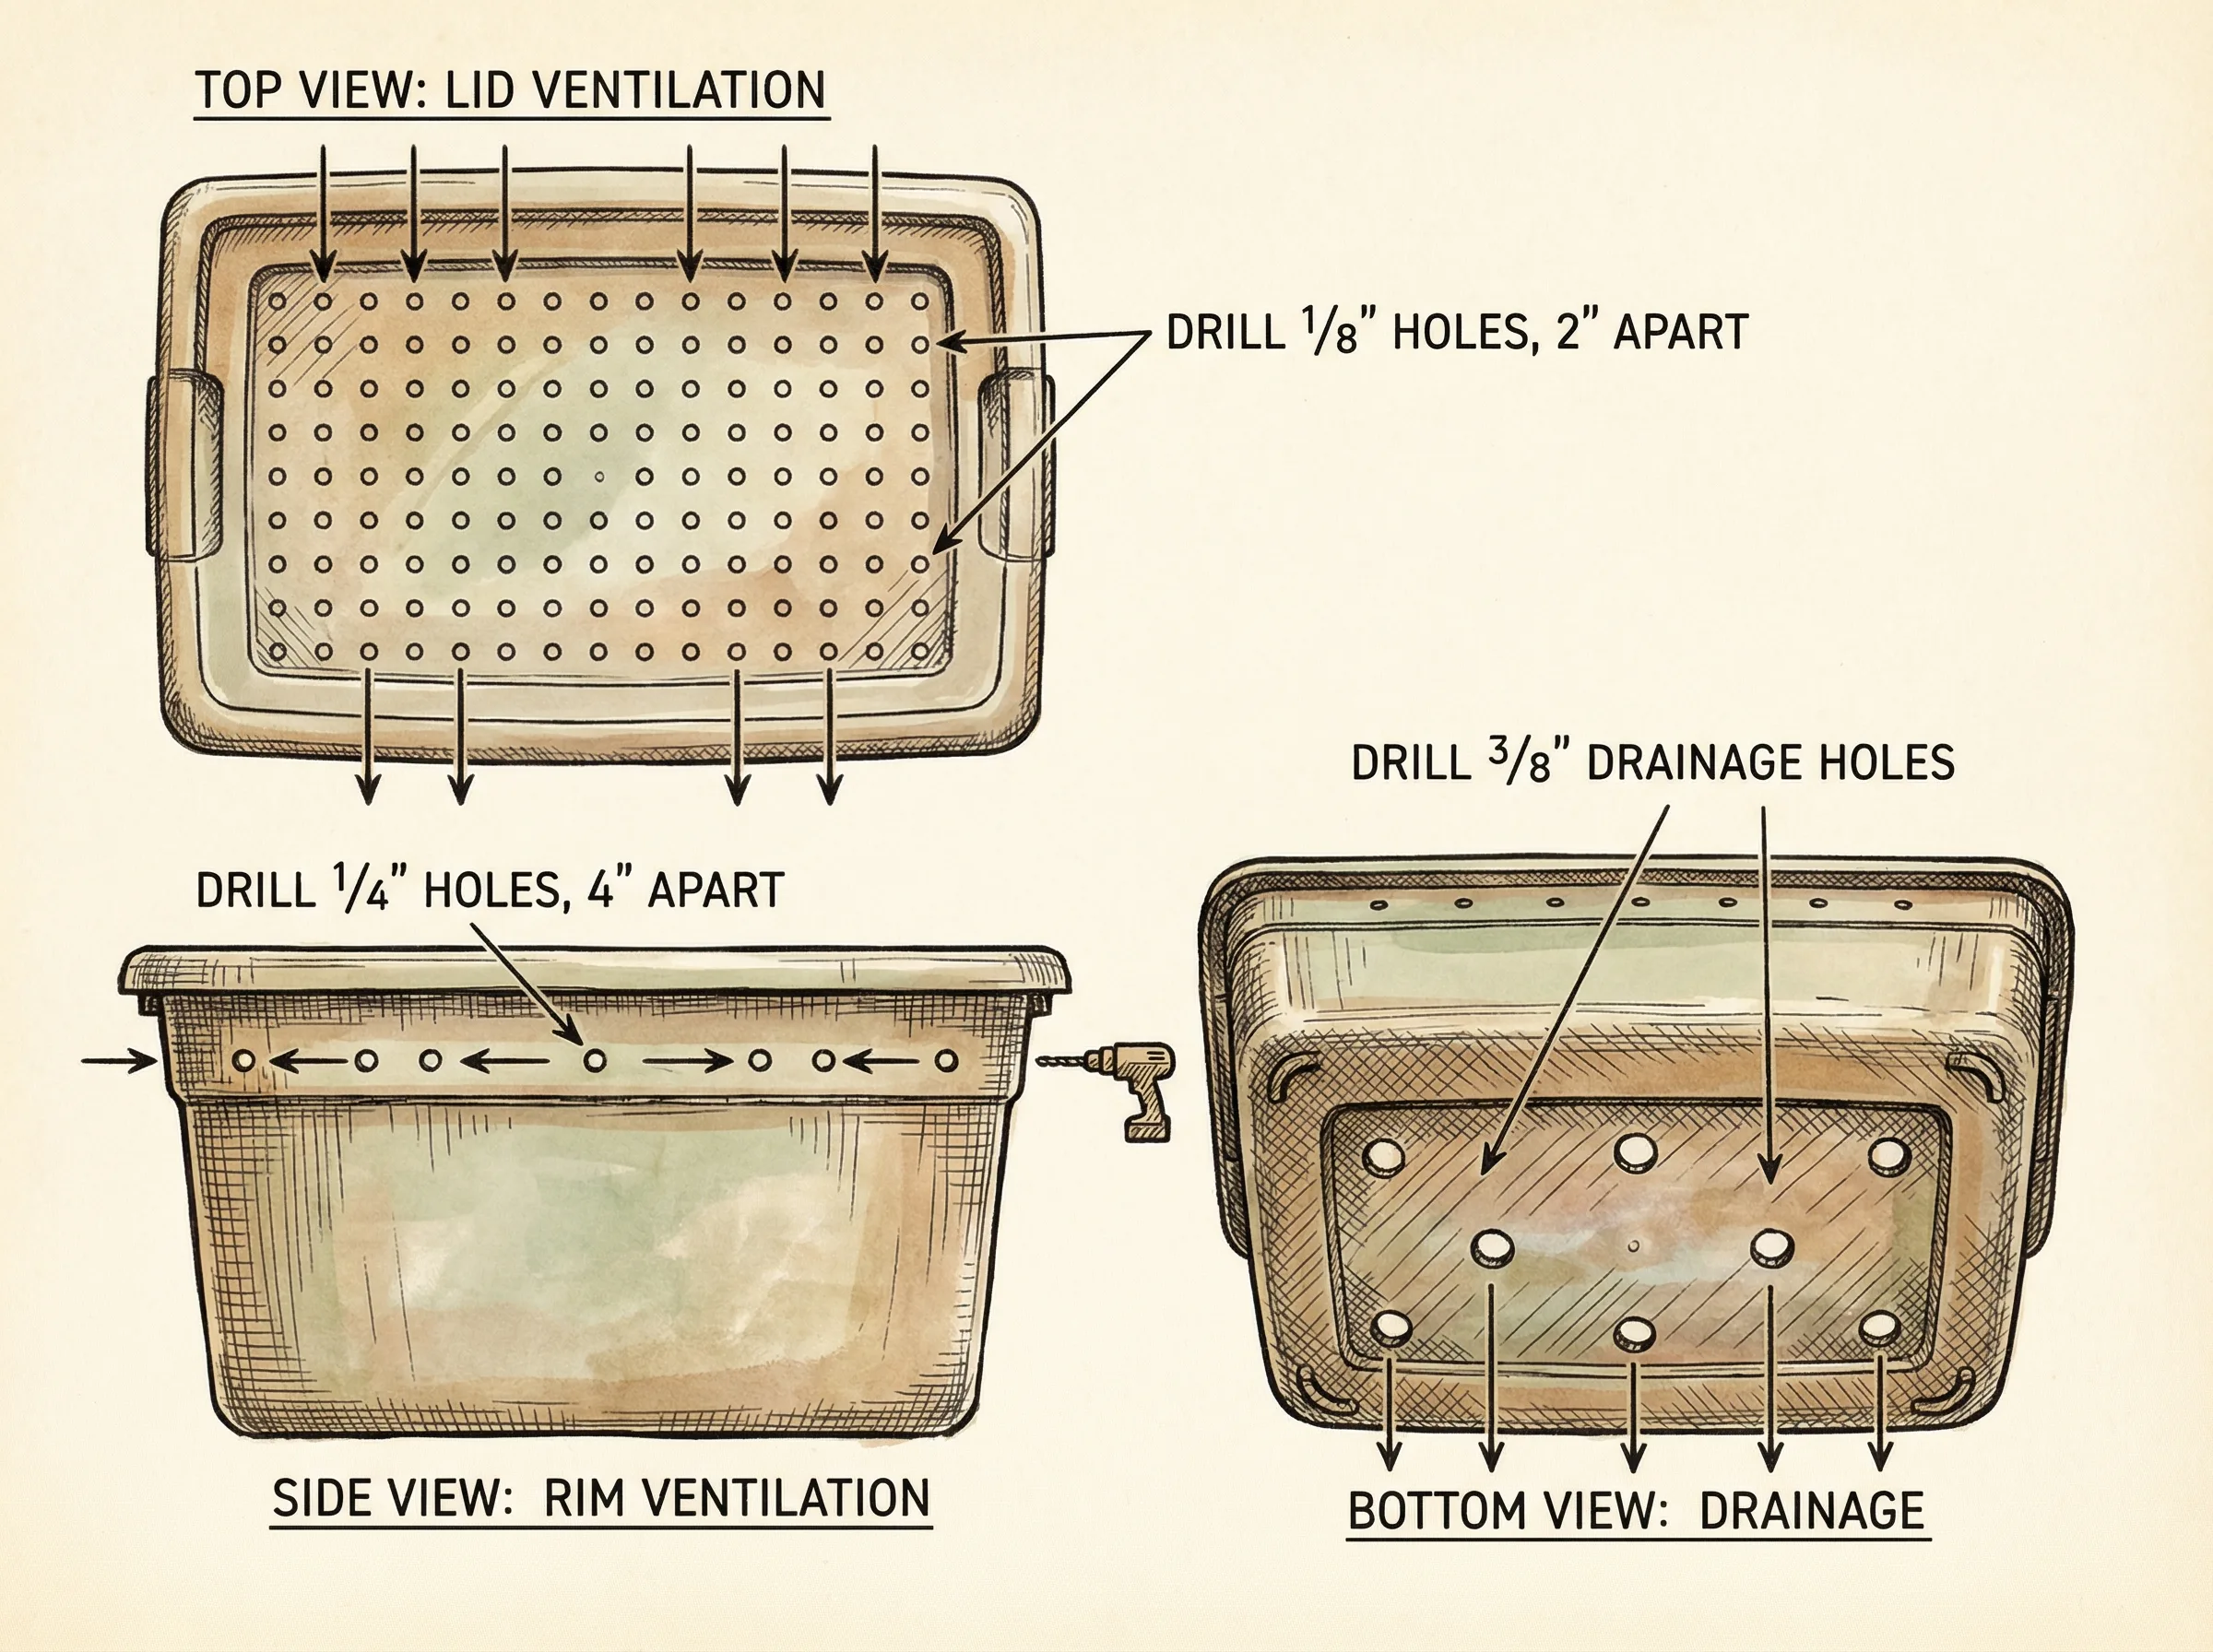
Step 2: Drill drainage holes in the bottom. Using the 1/4 inch bit, drill 8-10 holes in the bottom of the tote. These let excess moisture drain out, preventing waterlogging.
Step 3: Drill ventilation holes near the top of the sides. Using the 1/16 inch bit, drill a row of holes about 1-2 inches below the top rim on all four sides. About 10 holes per side.
Step 4: Cover drainage holes (optional). If you're worried about worms crawling out the bottom, hot-glue a piece of window screen over the drainage holes on the inside.
Step 5: Create a drip tray. Place the tote on a second tote lid, a baking sheet, or a shallow tray to catch drainage (worm tea!). Elevate the bin slightly with small blocks or bricks so it doesn't sit in its own drainage.
That's it. Your bin is ready for bedding and worms.
Pro Tips for Tote Bins
- Size matters. Surface area is more important than depth. Worms live in the top 6-8 inches, so a wider, shallower bin works better than a tall, narrow one.
- Dark colors work best. If you can only find a clear tote, wrap the outside with dark garbage bags or duct tape.
- Two-bin system. Buy two identical totes. When the first is full, stack the second on top with food in it. Worms migrate up through the drainage holes into the new bin, leaving finished castings behind.
Option 2: Building a Stacking Tray System
If you want to avoid the hassle of manually separating worms from castings, a stacking system is the way to go.
The Concept
Multiple shallow trays with mesh or perforated bottoms stack on top of each other. You start composting in the bottom tray. When it's mostly full, you add a new tray on top with fresh bedding and food. Worms migrate up through the holes to get to the new food, leaving finished castings in the bottom tray that you can pull out.
DIY Stacking System
Materials:
- 3-4 shallow plastic tubs (5-8 gallon each, same size)
- 1 solid bottom tub (for collecting drainage)
- Drill with 1/4 inch bit
- Optional: 1/4 inch hardware cloth for sturdier tray bottoms
Instructions:
- Bottom (collection) tub: Leave this one unmodified. It catches drainage. Add a spigot if you want easy access to worm tea.
- Working trays (2-3): Drill 1/4 inch holes in the bottom of each, spaced about 1-2 inches apart. The holes need to be big enough for worms to crawl through.
- Lid: Drill ventilation holes in the top lid just like the tote bin.
- Assembly: Stack the collection tub on the bottom, first working tray on top, lid on top of that.
Commercial Options Worth Considering
If DIY isn't your thing, these commercial systems have stood the test of time:
- Worm Factory 360 — The most popular stacking system. Easy to use, well-designed. Around $100-130.
- Urban Worm Bag — A fabric flow-through design. Worms process food at the top, finished castings fall to the bottom. Around $100.
- Hungry Bin — A premium, tapered flow-through design from New Zealand. Beautiful and functional but pricey at $300+.
Option 3: Building a Wooden Bin
Wood bins look great, insulate well, and last for years. Cedar and pine are the most common choices.
Materials
- 4 pieces of untreated lumber (1x12, 24 inches long) for the sides
- 1 piece of plywood (24x24 inches) for the bottom
- 1 piece of plywood (24x24 inches) for the lid (with hinges)
- Wood screws
- Drill with 1/4 inch bit for drainage holes
- 2 small hinges for the lid
- Optional: waterproof sealant (food-safe, no chemicals)
Important: Never use pressure-treated lumber. The chemicals used to treat it (copper, arsenic) will kill your worms and contaminate your compost.
Instructions
- Assemble the box. Screw the four side pieces together to form a box. Screw the bottom piece on.
- Drill drainage. Drill 8-12 holes in the bottom for drainage.
- Drill ventilation. Drill a row of small holes along the top edge of each side, plus holes in the lid.
- Attach the lid. Use hinges to attach the lid so it can swing open.
- Raise it up. Place the bin on blocks or legs to allow drainage.
Sizing Guidelines
| Household | Recommended Size | Capacity |
|---|---|---|
| 1-2 people | 2 ft x 2 ft x 1 ft | ~1 lb worms |
| 3-4 people | 3 ft x 2 ft x 1 ft | ~2 lbs worms |
| 5+ people | 4 ft x 2 ft x 1 ft | ~3 lbs worms |
The key dimension is surface area, not depth. Worms work the top 6-8 inches, so there's no benefit to making the bin deeper than about 12-14 inches.
Setting Up Your New Bin
Regardless of which bin type you chose, the setup process is the same:
1. Prepare Bedding
Shred newspaper into 1-inch strips, or tear cardboard into small pieces. Coconut coir is another excellent option. You need enough to fill the bin about 3/4 full when fluffed.
Soak the bedding in water for a few minutes, then squeeze it out until it's about as damp as a wrung-out sponge. This is the correct moisture level — wet enough that a drop or two comes out when you squeeze hard, but not dripping.
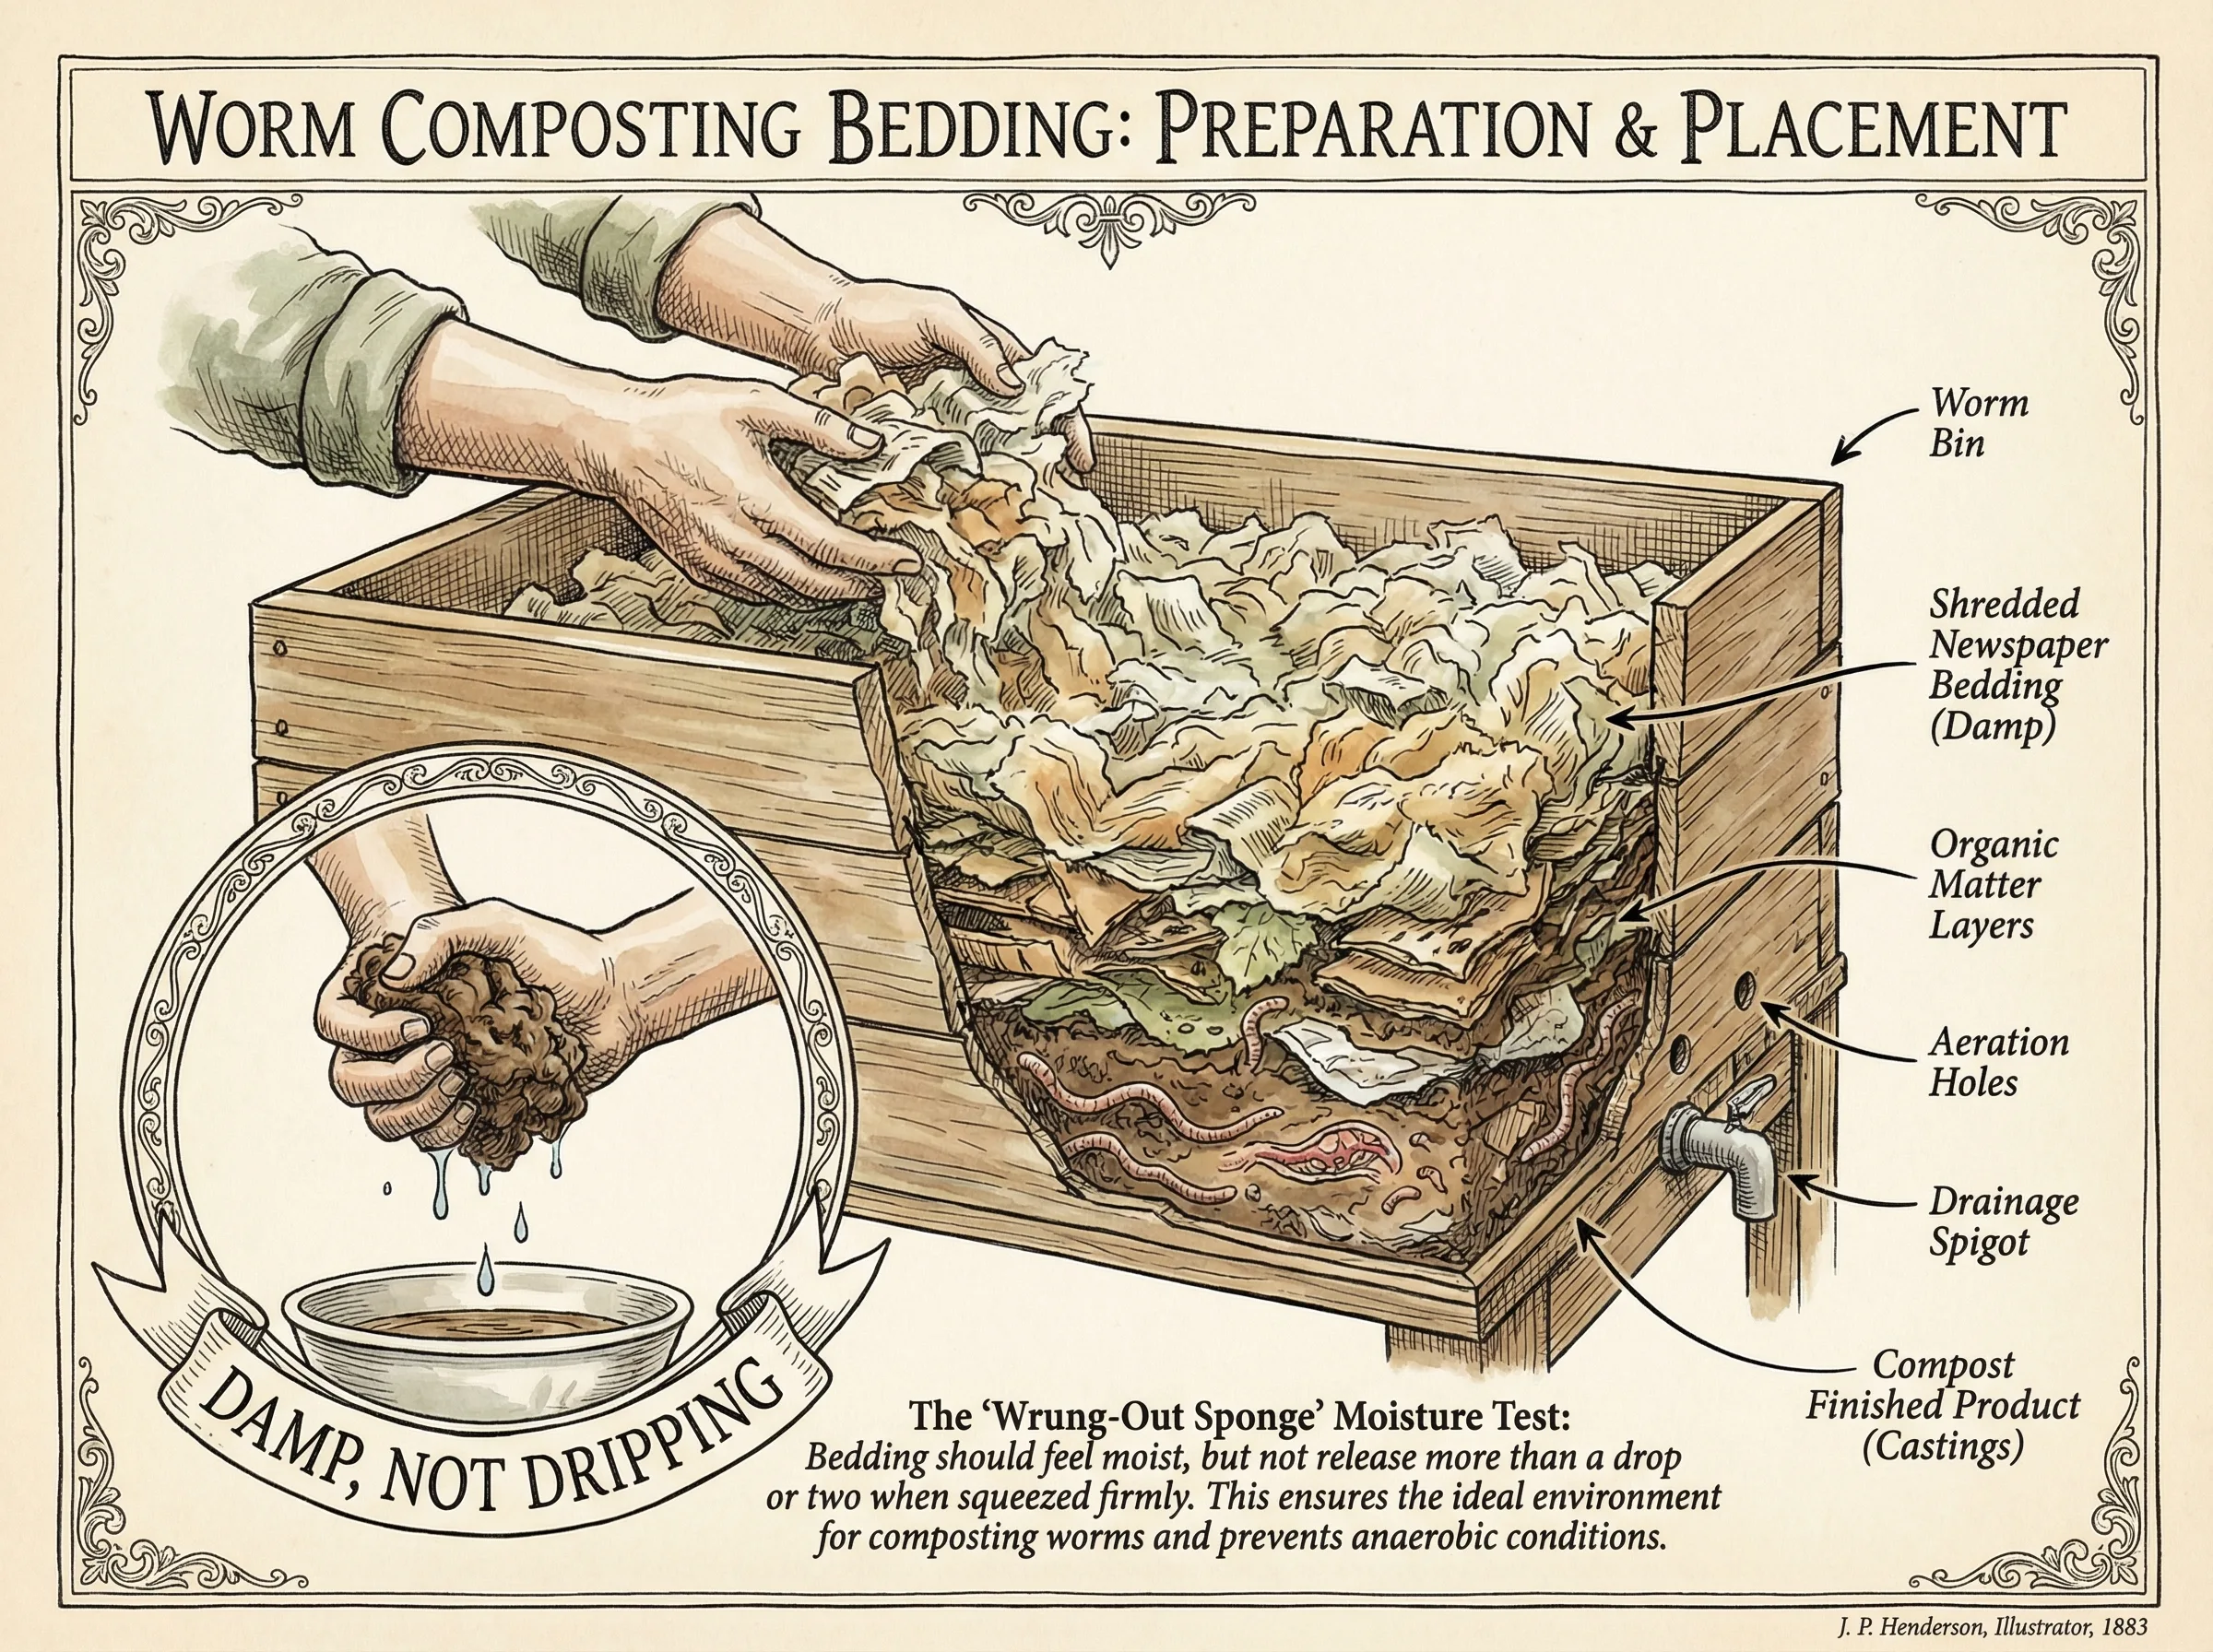
2. Add Bedding
Place the damp, fluffed bedding in the bin. Don't pack it down. Throw in a handful or two of plain garden soil — this introduces beneficial microorganisms and provides grit that helps worms digest food.
3. Add Worms
Place your worms on top of the bedding. Leave the lid open with a light on for 30-60 minutes. The worms will burrow down to escape the light.
4. Location
Put the bin somewhere with:
- Stable temperatures (55-77°F / 13-25°C)
- No direct sunlight
- Good airflow
- Easy access for feeding
5. First Feeding
Wait 2-3 days, then bury a small amount of food scraps in one corner. Cover with bedding. See our feeding guide for details.
Bin Maintenance
Monthly Tasks
- Check moisture. Squeeze a handful of bedding. If no moisture comes out, mist with water. If it's soggy, add dry bedding.
- Add bedding. As old bedding breaks down, add more shredded newspaper or cardboard on top.
- Rotate feeding spots. Bury food in a different corner each feeding to encourage worms to spread out.
Quarterly Tasks
- Check for overcrowding. If the bin is getting very full of castings and there's not much fresh bedding left, it's time to harvest.
- Check pH. If the bin smells sour, add crushed eggshells or a sprinkle of garden lime to buffer acidity.
Next Steps
- Getting Started with Worm Composting — The complete overview
- Best Worms for Composting — Choose your worms
- Feeding Your Worms — What goes in the bin
- Troubleshooting Your Worm Bin — Fix common problems
Interactive Build Guide
Follow along step-by-step and check off each stage as you build your bin:
Step 1: Gather Materials
Get an opaque plastic storage tote (8-14 gallon), a drill with 1/4" and 1/16" bits, and some window screen mesh.
Tip: Dark colors work best — worms hate light.
What Size Bin Do You Need?
Slide to your household size for personalized recommendations:
Bin Size Calculator
Recommended Setup
Rule of thumb: 1 sq ft of surface area per lb of worms, and 2 lbs of worms per lb of daily food waste.
