Don't Panic
Almost every worm bin problem is fixable, and almost every vermicomposter runs into issues sooner or later. The worms are tougher than you think — they've been composting organic matter for 300 million years. A few fruit flies aren't going to stop them.
This guide covers the most common problems in roughly the order you're likely to encounter them. For each issue, we'll cover what's happening, why, and exactly how to fix it.
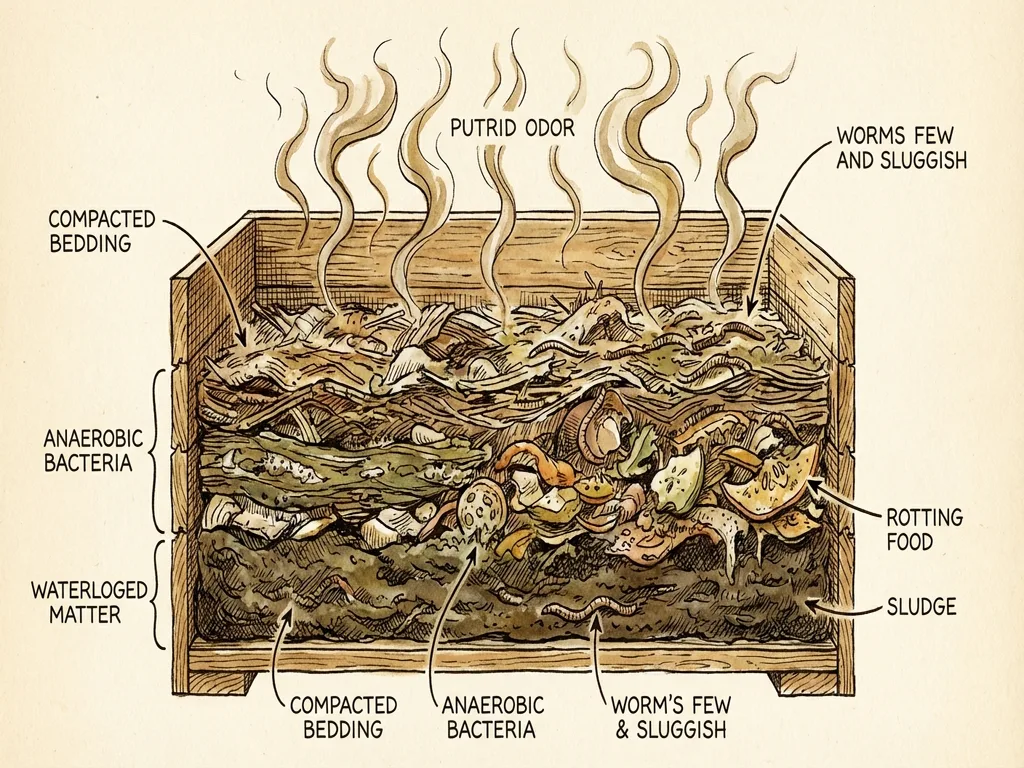
Problem 1: My Bin Smells Bad
A healthy worm bin should smell like forest floor — earthy, slightly sweet, maybe a hint of mushroom. If your bin smells like garbage, rotting food, or ammonia, something's off.
Cause: Anaerobic Conditions
The most common cause of bin odor is anaerobic decomposition — food rotting without oxygen. This happens when the bin is too wet, too compacted, or has too much food for the worms to process.
How to Fix It
- Stop feeding immediately. Give the worms time to catch up. Resume feeding in 1-2 weeks, and start with smaller amounts.
- Add dry bedding. Shred a bunch of newspaper or cardboard and mix it into the top layers of the bin. This absorbs excess moisture and introduces air pockets.
- Fluff the contents. Gently turn the top few inches of the bin with a hand fork or your hands. You're not trying to mix everything — just break up compacted areas and introduce air.
- Check drainage. Make sure the drainage holes aren't clogged. Water should be able to drain freely from the bottom.
- Remove any large chunks of rotting food. If there's a big piece of watermelon rind or a pile of citrus that's gone slimy and the worms are ignoring it, take it out.
Prevention
- Don't overfeed (this is the root cause 90% of the time)
- Always bury food under bedding
- Maintain proper moisture (wrung-out sponge feel)
- Keep the carbon-to-nitrogen ratio balanced — every time you add food, add an equal volume of shredded paper/cardboard
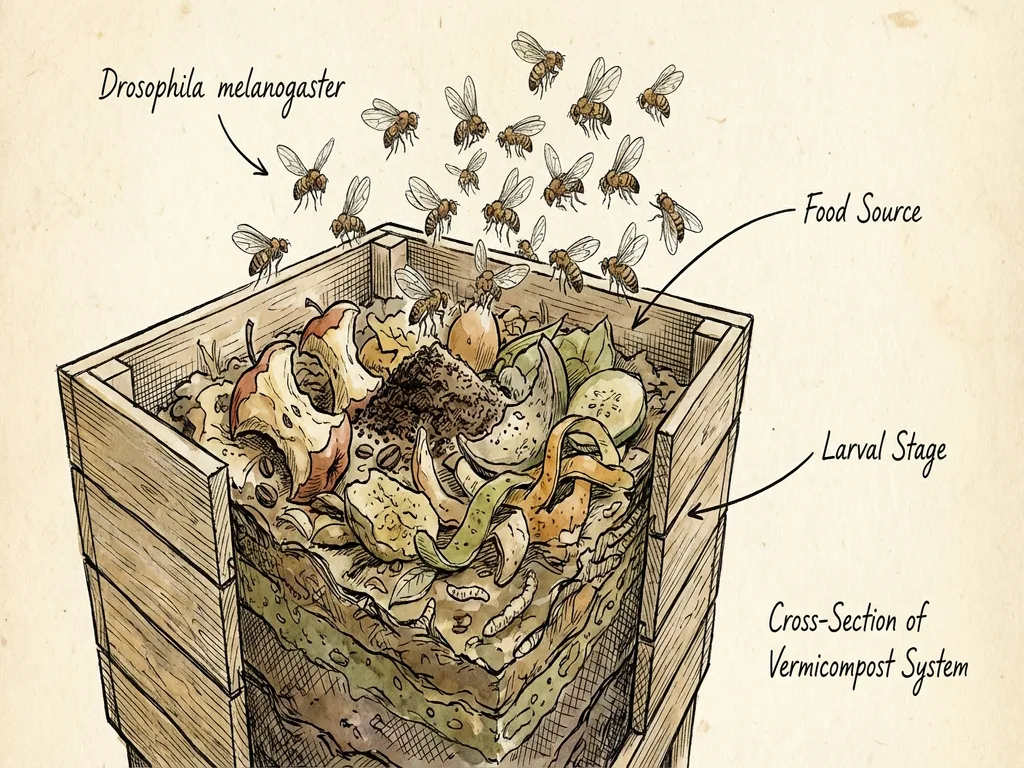
Problem 2: Fruit Flies
Fruit flies are the most common pest in worm bins, and the most annoying. The good news: they're harmless to the worms. The bad news: they're incredibly annoying.
Why They Show Up
Fruit flies lay eggs on fruit (especially bananas, melons, and stone fruit). Those eggs hatch in the warm, moist environment of your worm bin. If food is sitting on the surface, it's a fruit fly breeding ground.
How to Fix It
Immediate actions:
- Bury all exposed food under 3+ inches of bedding. This is the single most effective thing you can do.
- Set traps. Fill a small jar with apple cider vinegar and a drop of dish soap. The flies are attracted to the vinegar and the soap breaks the surface tension so they drown. Place near the bin.
- Add a thick layer of dry bedding on top. A 2-3 inch layer of shredded newspaper on the surface creates a barrier that fruit flies can't easily penetrate.
If the infestation is bad: 4. Freeze food before feeding. This kills any fruit fly eggs already on the food. 5. Stop feeding fruit for 2 weeks. Switch to things fruit flies don't love: plain cardboard, coffee grounds, eggshells, potato peels. 6. Cover the bin with a fine mesh screen (like pantyhose stretched over the top) to prevent adult flies from entering.
Prevention
- Always bury food, never leave it exposed
- Freeze scraps before adding to the bin
- Keep a layer of dry bedding on top at all times
- Don't overfeed — uneaten food attracts flies
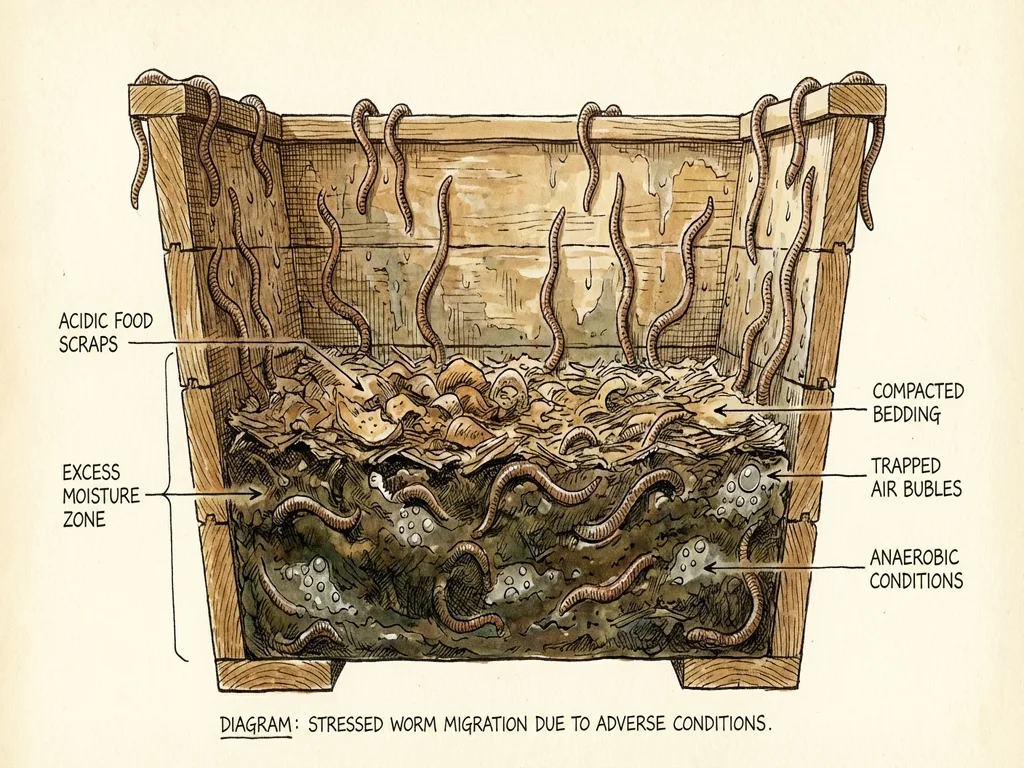
Problem 3: Worms Are Escaping
If you find worms crawling up the sides, congregating on the lid, or escaping the bin entirely, they're trying to tell you something: conditions inside are worse than conditions outside. That's a strong signal.
Common Causes
- Bin is too wet. The most common reason. Worms will flee waterlogged conditions.
- Bin is too acidic. Excess citrus or other acidic foods can drop the pH to uncomfortable levels.
- Temperature extremes. Too hot (above 85°F) or too cold (below 40°F).
- New bin adjustment. Worms often try to explore for the first few days in a new home. This is usually temporary.
- Ammonia or gas buildup. Anaerobic pockets can produce gases that drive worms away.
How to Fix It
- Check moisture. If the bin is soggy, add lots of dry shredded newspaper or cardboard. If there's standing water, drain it immediately.
- Check for odor. If the bin stinks, follow the smell fix above.
- Add eggshells. Crushed eggshells buffer acidity. Add a handful.
- Leave a light on. Worms are photophobic (they hate light). A light above the bin will drive them back down. Leave it on for the first few nights if you're having escape issues.
- Check temperature. Move the bin to a temperature-stable location if needed.
Prevention
- Maintain proper moisture levels
- Don't overfeed acidic foods
- Keep the bin in a temperature-stable location
- Add eggshells regularly
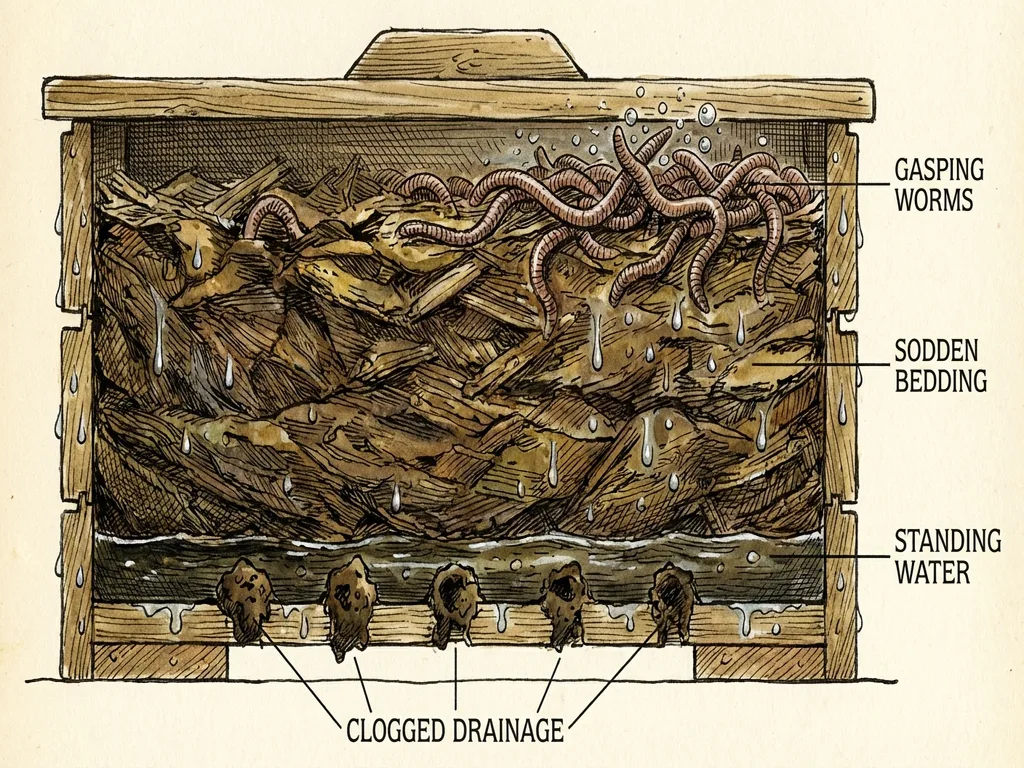
Problem 4: The Bin Is Too Wet
A soggy bin creates anaerobic conditions, bad smells, and unhappy worms. Ideally, the contents should feel like a wrung-out sponge — moist but not dripping.
Common Causes
- High-water-content foods (watermelon, lettuce, tomatoes) without enough dry bedding to absorb the moisture
- Clogged drainage holes
- Too little bedding relative to food
- Humid environment
How to Fix It
- Add dry bedding. This is the quickest fix. Shred a bunch of newspaper or tear up cardboard and mix it in. It'll absorb excess moisture within a day or two.
- Open the lid. Leave the lid propped open for a few hours to let some moisture evaporate. Put a light on so worms stay down.
- Check drainage. Clear any clogged holes in the bottom.
- Remove soggy food. If there's identifiable waterlogged food, take it out.
Problem 5: The Bin Is Too Dry
Less common than too wet, but it happens — especially in dry climates, heated indoor spaces, or if you've been neglecting the bin.
Signs
- Bedding feels papery and dusty
- Worms are sluggish or burrowing deep
- Food isn't decomposing
- Edges and corners are bone dry
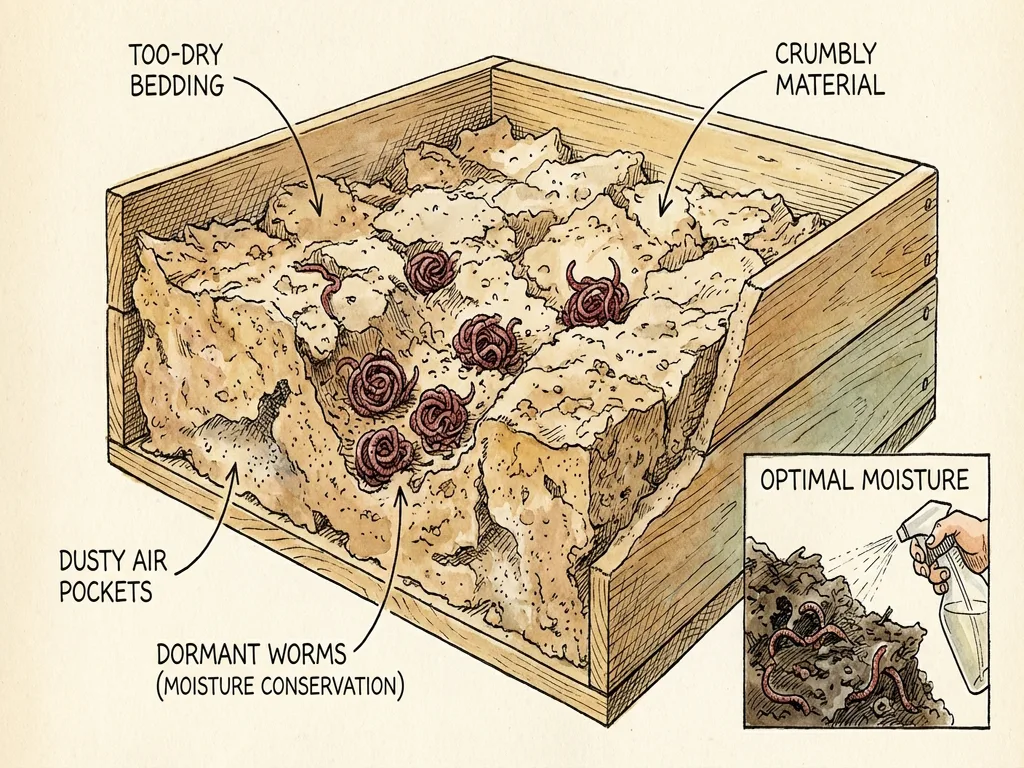
How to Fix It
- Mist with water. Use a spray bottle to dampen the bedding evenly. Don't dump water in — mist it.
- Add wet food. Watermelon rind, cucumber, lettuce, and other high-moisture foods help.
- Soak new bedding. Add pre-moistened shredded newspaper.
- Partially cover ventilation holes if the bin is drying out too fast (but don't seal them completely — worms need air).
Problem 6: Mold in the Bin
White, fuzzy mold growing on food in the bin looks alarming but is actually completely normal and harmless. Mold is a decomposer — it's helping break down the food. Worms eat mold readily.
When to Not Worry
- White or gray fuzzy mold on food scraps — normal
- Mushrooms sprouting from cardboard — normal
- Mold on top of bedding — normal (add a dry layer of bedding on top if it bothers you)
When to Act
- Green or black mold covering large areas and the bin smells bad — this indicates excess moisture and poor airflow. Fix the moisture problem (see above).
- You personally have mold allergies — keep the bin well-ventilated, in a separate room, or outdoors.
Problem 7: Tiny White Worms or Mites
Pot Worms
Tiny (1/4 inch), white, thread-like worms that appear in large numbers. These are pot worms (Enchytraeidae), not baby composting worms. They're harmless — they're also decomposers — but their presence often indicates the bin is too acidic or too wet.
Fix: Add crushed eggshells, reduce acidic food, and adjust moisture.
Mites
Tiny white, brown, or red specks crawling on surfaces. Several species of mites live in worm bins and most are harmless — they're also eating decomposing matter.
When they're a problem: Red mites (predatory mites) in very large numbers can stress worms. If you see red mites covering worms or food in thick clusters:
- Expose the bin to sunlight for an hour (mites flee light faster than worms)
- Place a piece of watermelon rind on top overnight — mites will cluster on it — then remove and discard in the morning
- Reduce moisture slightly
- Reduce feeding until the mite population stabilizes
Problem 8: Slow Composting
If your bin seems sluggish — food isn't breaking down, castings aren't accumulating — there are a few possible reasons.
Causes and Fixes
- Too cold. Below 55°F, worms slow way down. Move the bin to a warmer spot.
- Too few worms. If you started with a small number, be patient. Population doubles every 2-3 months under good conditions.
- Food pieces too large. Chop food smaller. Freeze and thaw to speed decomposition.
- Wrong food-to-bedding ratio. Too much carbon (bedding) slows things down. Make sure you're adding enough nitrogen (food scraps).
- Low microbial activity. Add a handful of garden soil or finished compost to introduce beneficial microbes.
Problem 9: Worms Are Dying
Finding dead worms is concerning but not always a sign of disaster. A few dead worms is normal turnover. Mass die-off requires investigation.
Common Causes of Mass Die-Off
- Temperature extremes. Above 90°F or below 35°F can kill worms quickly.
- Chemical exposure. Pesticide-treated food scraps, cleaning product residue on containers, treated wood.
- Severe overfeeding leading to toxic anaerobic conditions.
- Protein poisoning. Large amounts of high-nitrogen food (fresh grass clippings, too much coffee) can spike ammonia levels.
- Flooding. Waterlogged bin with no drainage.
What to Do
- Remove obvious problems (rotting food, standing water, chemical sources).
- Add fresh, dry bedding to reset conditions.
- Ensure proper drainage and ventilation.
- Move to a temperature-stable location.
- Wait. If some worms survived, they'll recover. Check for cocoons (small, lemon-shaped capsules) — even if adults died, babies may hatch.
Quick Reference: Worm Bin Health Checklist
Run through this checklist monthly:
- Moisture: Wrung-out sponge feel?
- Smell: Earthy, like forest floor?
- Temperature: 55-77°F?
- Food: Being consumed within a week?
- Worms: Active, pink/red, burrowing?
- Bedding: Sufficient depth (3+ inches on top)?
- Drainage: Holes clear, not clogged?
- Pests: Fruit flies under control?
If you can answer yes to all of these, your bin is healthy. If not, the sections above tell you exactly how to fix it.
Next Steps
- Getting Started with Worm Composting — The beginner's overview
- Feeding Your Worms — Get the feeding right
- Building Your First Worm Bin — Set up the right environment
- Best Worms for Composting — Make sure you have the right species
What's Wrong With My Bin?
Answer a few questions and we'll diagnose the issue:
What's Wrong With My Bin?
Answer a few questions and we'll diagnose the issue.
Bin Health Checker
How healthy is your worm bin? Check each item that applies:
Bin Health Checker
How healthy is your worm bin? Check each item that applies.
Check each item that applies to your bin to see how things are going.